Greg Merrell, Kerry Bemers, and Arnold-Peter Weiss
DEFINITION
![]() Phalangeal condylar fractures include unicondylar and bicondylar intra-articular fracture of the distal ends of the proximal and middle phalanx. Proximal phalangeal condylar fractures are more common.
Phalangeal condylar fractures include unicondylar and bicondylar intra-articular fracture of the distal ends of the proximal and middle phalanx. Proximal phalangeal condylar fractures are more common.
![]() Table 1 demonstrates the variety of condylar fracture patterns typically observed.
Table 1 demonstrates the variety of condylar fracture patterns typically observed.
ANATOMY
![]() Collateral ligaments, finger position, and direction of force play a role in both fracture pattern and the direction of displacement (FIG 1).
Collateral ligaments, finger position, and direction of force play a role in both fracture pattern and the direction of displacement (FIG 1).
![]() Blood is supplied to the condyles by a branch of the digital artery and vein that travels with the collateral ligaments.
Blood is supplied to the condyles by a branch of the digital artery and vein that travels with the collateral ligaments.
![]() Care must be taken not to disrupt this blood supply or to strip small fragments of their soft tissue attachments.
Care must be taken not to disrupt this blood supply or to strip small fragments of their soft tissue attachments.
PATHOGENESIS
![]() These fractures often are sports-related injuries.
These fractures often are sports-related injuries.
![]() The mechanism is hypothesized to be tension or rotation force through the collateral ligaments for an oblique fracture and compression and subluxation in the case of a coronal fracture.1,5
The mechanism is hypothesized to be tension or rotation force through the collateral ligaments for an oblique fracture and compression and subluxation in the case of a coronal fracture.1,5
![]() Fractures often are unstable because there is a minimal periosteal sleeve, and forces seen at the joint are substantial.
Fractures often are unstable because there is a minimal periosteal sleeve, and forces seen at the joint are substantial.
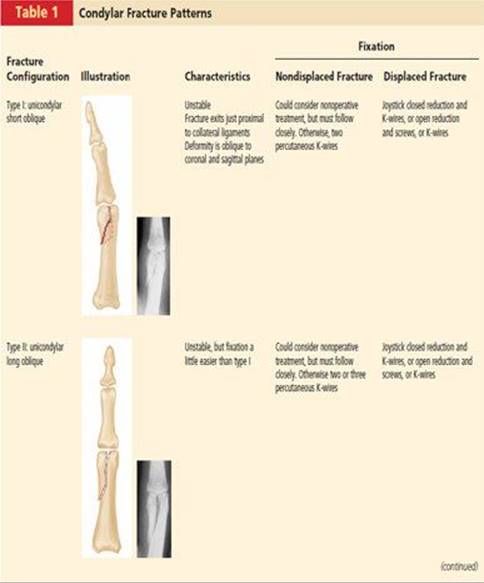
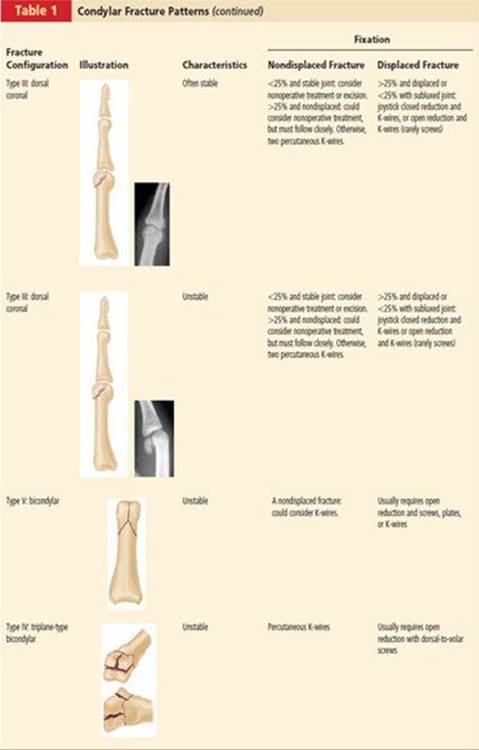
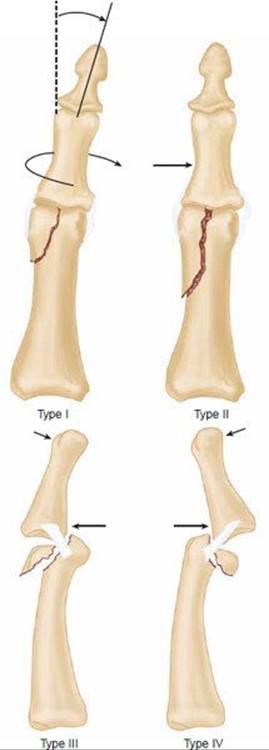
FIG 1 • Direction of applied force determines the fracture type.
![]() Most commonly, the condyle toward the midline of the hand (ie, the middle finger axis) is fractured: the ulnar condyle in the index finger and thumb and the radial condyle in the ring and small fingers.
Most commonly, the condyle toward the midline of the hand (ie, the middle finger axis) is fractured: the ulnar condyle in the index finger and thumb and the radial condyle in the ring and small fingers.
NATURAL HISTORY
![]() In developed countries, these fractures rarely go untreated, but they often are undertreated given that their presentation may be interpreted as a “minimally displaced finger fracture.”
In developed countries, these fractures rarely go untreated, but they often are undertreated given that their presentation may be interpreted as a “minimally displaced finger fracture.”
![]() Similar to any proximal interphalangeal (PIP) joint injury, lack of immobilization in full extension or prolonged immobilization will likely lead to a stiff finger.
Similar to any proximal interphalangeal (PIP) joint injury, lack of immobilization in full extension or prolonged immobilization will likely lead to a stiff finger.
![]() If treated conservatively, displacement of the fracture, a common occurrence, will lead either to early painful arthritic changes, or rotational malalignment on full flexion, or both.
If treated conservatively, displacement of the fracture, a common occurrence, will lead either to early painful arthritic changes, or rotational malalignment on full flexion, or both.
PATIENT HISTORY AND PHYSICAL FINDINGS
![]() A typical patient is a 24-year-old male baseball player who has sustained an angular impact to the finger from the ball.
A typical patient is a 24-year-old male baseball player who has sustained an angular impact to the finger from the ball.
![]() A high index of suspicion is required when evaluating these patients. The patient often is still able to bend the finger, and the fracture line can be subtle, but even nondisplaced fractures are prone to subsequent displacement.
A high index of suspicion is required when evaluating these patients. The patient often is still able to bend the finger, and the fracture line can be subtle, but even nondisplaced fractures are prone to subsequent displacement.
![]() Joint subluxation is an absolute indication for surgery and must be assessed carefully both radiographically and clinically.
Joint subluxation is an absolute indication for surgery and must be assessed carefully both radiographically and clinically.
![]() With any fracture displacement, a rotational deformity of the finger usually occurs, best assessed either looking end on at the digit or evaluating position with PIP flexion (FIG 2A).
With any fracture displacement, a rotational deformity of the finger usually occurs, best assessed either looking end on at the digit or evaluating position with PIP flexion (FIG 2A).
![]() Subtle joint depression may lead to angular deformity; this is best assessed by examining fingers in full extension (FIG 2B).
Subtle joint depression may lead to angular deformity; this is best assessed by examining fingers in full extension (FIG 2B).
IMAGING AND OTHER DIAGNOSTIC STUDIES
![]() The fracture pattern dictates the type of fixation or treatment.
The fracture pattern dictates the type of fixation or treatment.
![]() Multiple views should be obtained as needed to understand the geometry. Fluoroscopy often is helpful in obtaining precise views.
Multiple views should be obtained as needed to understand the geometry. Fluoroscopy often is helpful in obtaining precise views.
![]() Osteochondral fragments often are larger than they appear, because the cartilage is radiolucent.
Osteochondral fragments often are larger than they appear, because the cartilage is radiolucent.
![]() Hidden fracture lines are common and often are not visualized until surgery.
Hidden fracture lines are common and often are not visualized until surgery.
![]() CT occasionally is helpful.
CT occasionally is helpful.
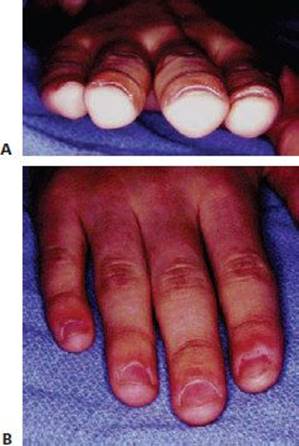
FIG 2 • A. End-on observation of the fingers can demonstrate subtle rotational deformities. B. Observation of the fingers in full extension can demonstrate subtle angular deformities caused by a displaced condyle.
DIFFERENTIAL DIAGNOSIS
![]() Collateral ligament or volar plate avulsion
Collateral ligament or volar plate avulsion
![]() PIP dislocation
PIP dislocation
![]() Distal shaft fracture
Distal shaft fracture
NONOPERATIVE MANAGEMENT
![]() Reports regarding the results of nonoperative treatment present conflicting results.
Reports regarding the results of nonoperative treatment present conflicting results.
![]() Weiss et al5 found five of seven nondisplaced fractures treated conservatively went on to displace and required surgery.
Weiss et al5 found five of seven nondisplaced fractures treated conservatively went on to displace and required surgery.
![]() In an 11-year follow-up study, using a functional outcome score, O'Rourke et al.4 demonstrated several interesting points:
In an 11-year follow-up study, using a functional outcome score, O'Rourke et al.4 demonstrated several interesting points:
![]() 27% of patients experienced joint aching in cold weather.
27% of patients experienced joint aching in cold weather.
![]() Four patients at 1 year follow-up had moderate pain and considered arthrodesis. However, by the time they got off the waiting list their symptoms had subsided to the point that they declined surgery.
Four patients at 1 year follow-up had moderate pain and considered arthrodesis. However, by the time they got off the waiting list their symptoms had subsided to the point that they declined surgery.
![]() No patient had less movement in the joint at year 11 than at year 1.
No patient had less movement in the joint at year 11 than at year 1.
![]() 25% of patients had continued improvement in range of motion after 12 months follow-up.
25% of patients had continued improvement in range of motion after 12 months follow-up.
![]() Three patients with displaced bicondylar fractures treated conservatively had outcomes of good, fair, and poor, respectively.
Three patients with displaced bicondylar fractures treated conservatively had outcomes of good, fair, and poor, respectively.
![]() Three patients with displaced unicondylar fractures treated conservatively had a good outcome; however, in O'Rourke et al's discussion, they conclude that these fractures should be treated with reduction and fixation.4
Three patients with displaced unicondylar fractures treated conservatively had a good outcome; however, in O'Rourke et al's discussion, they conclude that these fractures should be treated with reduction and fixation.4
![]() Operating on nondisplaced or minimally displaced fractures can be viewed in two ways:
Operating on nondisplaced or minimally displaced fractures can be viewed in two ways:
![]() On the one hand, a percentage of patients would be subjected to a procedure that they did not need. Also, with close follow-up, if a fracture were to displace later, it could be addressed at that point, although it would require slightly more work to regain reduction and functional restoration.
On the one hand, a percentage of patients would be subjected to a procedure that they did not need. Also, with close follow-up, if a fracture were to displace later, it could be addressed at that point, although it would require slightly more work to regain reduction and functional restoration.
![]() On the other hand, there is minimal morbidity in percutaneous pinning, and that would minimize the likelihood of displacement in a fracture that often is unstable.
On the other hand, there is minimal morbidity in percutaneous pinning, and that would minimize the likelihood of displacement in a fracture that often is unstable.
![]() Given the propensity for displacement and the potential functional difficulties with malunion, we recommend, at a minimum, percutaneous stabilization of most condylar fractures.
Given the propensity for displacement and the potential functional difficulties with malunion, we recommend, at a minimum, percutaneous stabilization of most condylar fractures.
![]() Several review texts suggest that coronal fractures of less than 25% of the joint surface with a stable congruent joint can be treated nonoperatively or with fragment excision. Although this may be true, there are few biomechanical or clinical outcomes data to support the statement.
Several review texts suggest that coronal fractures of less than 25% of the joint surface with a stable congruent joint can be treated nonoperatively or with fragment excision. Although this may be true, there are few biomechanical or clinical outcomes data to support the statement.
SURGICAL MANAGEMENT
Preoperative Planning
![]() Preoperative planning should be mindful of the goals of treatment of any articular fracture established by the AO:
Preoperative planning should be mindful of the goals of treatment of any articular fracture established by the AO:
![]() Anatomic reduction of the articular surface
Anatomic reduction of the articular surface
![]() Restoration of stability
Restoration of stability
![]() Minimizing soft tissue injury
Minimizing soft tissue injury
![]() Early mobilization
Early mobilization
![]() Access to a mini C-arm is highly advantageous.
Access to a mini C-arm is highly advantageous.
![]() Fluoroscopic examination under anesthesia provides a good sense of joint stability and fracture fragment orientation.
Fluoroscopic examination under anesthesia provides a good sense of joint stability and fracture fragment orientation.
![]() Fracture reduction, implant placement, and fracture stability are effectively evaluated fluoroscopically.
Fracture reduction, implant placement, and fracture stability are effectively evaluated fluoroscopically.
Positioning
![]() The patient is positioned supine with a hand table.
The patient is positioned supine with a hand table.
![]() If an assistant is unavailable, finger-trap traction also may be helpful.
If an assistant is unavailable, finger-trap traction also may be helpful.
Approach
![]() A unicondylar fracture typically is approached either between the central slip and lateral band (FIG 3) or via a midaxial approach.
A unicondylar fracture typically is approached either between the central slip and lateral band (FIG 3) or via a midaxial approach.
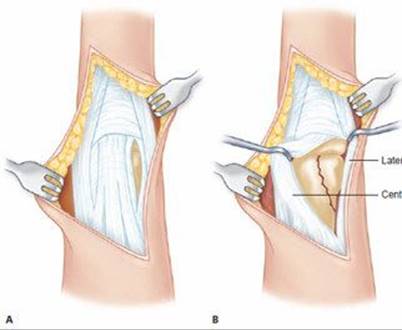
FIG 3 • A dorsal-lateral incision (A) with dissection between the lateral band and extensor mechanism (B) provides excellent exposure.
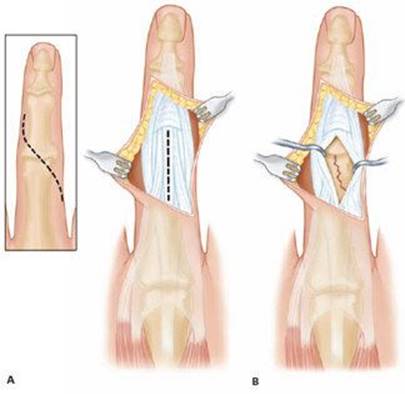
FIG 4 • A dorsal-lateral incision (A) with midline incision in the extensor mechanism (B) can provide additional exposure if needed.
![]() The lateral (mid-axial) approach is suggested as a means to minimize extensor mechanism scarring, but only if significant joint incongruity or comminution is absent.
The lateral (mid-axial) approach is suggested as a means to minimize extensor mechanism scarring, but only if significant joint incongruity or comminution is absent.
![]() If more extensive joint visualization is needed, the extensor mechanism can be incised and repaired later (FIG 4).
If more extensive joint visualization is needed, the extensor mechanism can be incised and repaired later (FIG 4).
![]() A bicondylar or triplane fracture requires a more global joint and fragment exposure.
A bicondylar or triplane fracture requires a more global joint and fragment exposure.
![]() A dorsal, slightly curvilinear incision is made.
A dorsal, slightly curvilinear incision is made.
![]() The extensor tendon may be split longitudinally, but preferably incisions are made on its borders, allowing mobilization and excellent joint exposure.
The extensor tendon may be split longitudinally, but preferably incisions are made on its borders, allowing mobilization and excellent joint exposure.
![]() A palmar approach is rarely used except for volar coronal shear fractures.
A palmar approach is rarely used except for volar coronal shear fractures.
![]() If necessary, make a Brunner-style volar incision, and retract the flexor tendons to expose the volar plate.
If necessary, make a Brunner-style volar incision, and retract the flexor tendons to expose the volar plate.
![]() If possible, reflect the volar plate on one side and a little up the lateral edge for exposure via a triangle-shaped flap.
If possible, reflect the volar plate on one side and a little up the lateral edge for exposure via a triangle-shaped flap.
![]() If more complete exposure is needed, make a transverse incision along the proximal edge of the volar plate, leaving enough proximal cuff to reattach the volar plate.
If more complete exposure is needed, make a transverse incision along the proximal edge of the volar plate, leaving enough proximal cuff to reattach the volar plate.
![]() Elevate the volar plate on a distal hinge, repair the fracture, and then reattach the volar plate.
Elevate the volar plate on a distal hinge, repair the fracture, and then reattach the volar plate.
![]() The PIP joint is prone to stiffness from injury, so every effort should be made to minimize surgical injury to the soft tissues.
The PIP joint is prone to stiffness from injury, so every effort should be made to minimize surgical injury to the soft tissues.
![]() Avoid at all costs stripping soft tissue attachments from small fracture fragments.
Avoid at all costs stripping soft tissue attachments from small fracture fragments.
TECHNIQUES
SHORT AND LONG OBLIQUE FRACTURE WITH PERCUTANEOUS REDUCTION, K-WIRES, MINIFRAGMENT SCREWS, OR CANNULATED HEADLESS COMPRESSION SCREWS
Tips for Achieving Fixation
![]() Visualize the fracture well using live fluoroscopy.
Visualize the fracture well using live fluoroscopy.
![]() Fracture displacement typically is in an oblique plane, sometimes not well appreciated on the straight anteroposterior or lateral views.
Fracture displacement typically is in an oblique plane, sometimes not well appreciated on the straight anteroposterior or lateral views.
![]() Use of the view on live fluoroscopy that best shows the displacement will make it possible to determine when reduction has truly been achieved.
Use of the view on live fluoroscopy that best shows the displacement will make it possible to determine when reduction has truly been achieved.
![]() Apply traction and rotation to the distal aspect of the finger to assist reduction through ligamentotaxis (TECH FIG 1A).
Apply traction and rotation to the distal aspect of the finger to assist reduction through ligamentotaxis (TECH FIG 1A).
![]() Try percutaneous manipulation of the fragment with a dental pick.
Try percutaneous manipulation of the fragment with a dental pick.
![]() If reduction is achieved, place either a pointed reduction clamp or the first K-wire to hold it.
If reduction is achieved, place either a pointed reduction clamp or the first K-wire to hold it.
![]() If the dental pick does not work, place one prong of a pointed reduction clamp through the skin into the stable condyle, then place the other prong into the fragment and try to reduce the fragment with a slight rotation of the clamp (TECH FIG 1B).
If the dental pick does not work, place one prong of a pointed reduction clamp through the skin into the stable condyle, then place the other prong into the fragment and try to reduce the fragment with a slight rotation of the clamp (TECH FIG 1B).
![]() Resist the urge to use clamp compression to force a reduction, because the small fragments shatter easily.
Resist the urge to use clamp compression to force a reduction, because the small fragments shatter easily.
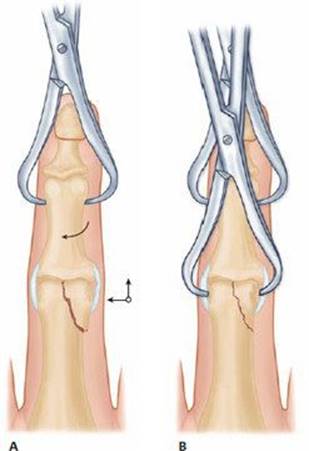
TECH FIG 1 • Percutaneous fracture reduction with traction and rotational correction (A), followed by percutaneous clamping (B).
![]() Avoid placing the clamp volar to the mid-axial line to avoid iatrogenic injury to the neurovascular bundle.
Avoid placing the clamp volar to the mid-axial line to avoid iatrogenic injury to the neurovascular bundle.
![]() If that does not succeed, try a 0.035 K-wire joystick or proceed with an open reduction.
If that does not succeed, try a 0.035 K-wire joystick or proceed with an open reduction.
Fixation Choices
![]() In our practice, if we can achieve a percutaneous reduction, we prefer the use of multiple 0.028-inch K-wires.
In our practice, if we can achieve a percutaneous reduction, we prefer the use of multiple 0.028-inch K-wires.
![]() If we have to open to achieve the reduction, we prefer the stability of screw fixation.
If we have to open to achieve the reduction, we prefer the stability of screw fixation.
![]() Occasionally, fragments are too small or comminuted for screw fixation, necessitating the use of K-wires.
Occasionally, fragments are too small or comminuted for screw fixation, necessitating the use of K-wires.
K-Wire Fixation
![]() A single K-wire is not sufficient fixation.
A single K-wire is not sufficient fixation.
![]() Drive two K-wires from the fragment into the shaft either transversely or obliquely depending on the fracture orientation (TECH FIG 2).
Drive two K-wires from the fragment into the shaft either transversely or obliquely depending on the fracture orientation (TECH FIG 2).
![]() The first wire should be placed perpendicular to the fracture line to maximize fixation and minimize displacement while capturing the reduction.
The first wire should be placed perpendicular to the fracture line to maximize fixation and minimize displacement while capturing the reduction.
![]() Additional wires should be placed slightly oblique to the first wire so that the fracture fragment cannot displace along the axis of two parallel wires.
Additional wires should be placed slightly oblique to the first wire so that the fracture fragment cannot displace along the axis of two parallel wires.
![]() The best bone quality is found distal and volar; therefore, to avoid injury, insert wires from contralateral dorsal side of the intact condyle and advance distally and volarly.
The best bone quality is found distal and volar; therefore, to avoid injury, insert wires from contralateral dorsal side of the intact condyle and advance distally and volarly.
TECH FIG 2 • Pinning with K-wires.
![]() Hold the PIP joint in extension while driving wires.
Hold the PIP joint in extension while driving wires.
![]() This position keeps the lateral bands dorsal, and the entry of the K-wire can be just volar to the lateral bands.
This position keeps the lateral bands dorsal, and the entry of the K-wire can be just volar to the lateral bands.
![]() The condyle, as viewed on a lateral image, is the area with the least excursion of the collateral ligaments; therefore, K-wires in the volar position cause the least restriction of motion.
The condyle, as viewed on a lateral image, is the area with the least excursion of the collateral ligaments; therefore, K-wires in the volar position cause the least restriction of motion.
![]() The use of 0.028-inch K-wires avoids further fragmentation of fragments and usually provides sufficient fixation.
The use of 0.028-inch K-wires avoids further fragmentation of fragments and usually provides sufficient fixation.
Screw Fixation
![]() Screw fixation should avoid the collateral ligaments by one of four methods (TECH FIG 3):
Screw fixation should avoid the collateral ligaments by one of four methods (TECH FIG 3):
![]() Flexing the joint and passing the screw distal and dorsal to the collateral ligaments
Flexing the joint and passing the screw distal and dorsal to the collateral ligaments
![]() Keeping the joint in extension, with subperiosteal stripping of a limited portion of the collateral ligament origin from proximal to distal
Keeping the joint in extension, with subperiosteal stripping of a limited portion of the collateral ligament origin from proximal to distal
![]() Excising a small window in the collateral ligament for the screw head, which is gently countersunk
Excising a small window in the collateral ligament for the screw head, which is gently countersunk
![]() Placing the screw proximal to the collateral ligament if the fracture extends far enough proximally
Placing the screw proximal to the collateral ligament if the fracture extends far enough proximally
![]() Screw fixation must not impinge on the collateral ligaments through any of the four methods listed, or the screw will cause permanent difficulties with joint motion.
Screw fixation must not impinge on the collateral ligaments through any of the four methods listed, or the screw will cause permanent difficulties with joint motion.
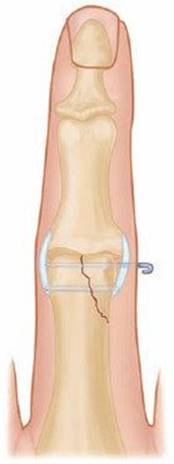
![]() Screw fixation should be with 1.0 or 1.3-mm screws placed in lag fashion (TECH FIG 4A–E).
Screw fixation should be with 1.0 or 1.3-mm screws placed in lag fashion (TECH FIG 4A–E).
![]() For longer oblique fractures, make a stab incision, spread with a snap, and place three screws or three or more wires spaced along the fracture (TECH FIG 4F).
For longer oblique fractures, make a stab incision, spread with a snap, and place three screws or three or more wires spaced along the fracture (TECH FIG 4F).

TECH FIG 3 • The four methods for screw placement to minimize impingement on collaterals. Methods A and C require seating the screw head almost flush with the bone. A. Creation of a small window in the collateral for screw placement. B. Reflection of the proximal part of the collateral ligament for screw placement. C. Flexion to allow exposure of the condyle for screw placement. D. In a longer fracture, placement of the screw proximal to collateral insertion.
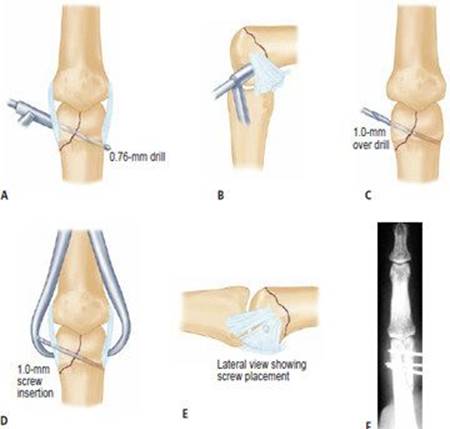
TECH FIG 4 • Placement of a lag screw. A. 0.076-inch drilling is done through both cortices. B. The joint is flexed to permit placement of the screw out of the way of the collateral ligaments. C. Overdrilling only the proximal cortex with a 1.0-mm drill. D. Compression of fragments by a reduction clamp while placing the lag screw. E. Position of the screw head after extension of the joint. F. Long oblique fracture maintained with three 0.028-inch K-wires.
![]() The first screw should be placed in lag mode, perpendicular to the fracture line, to prevent displacement of the fracture during compression.
The first screw should be placed in lag mode, perpendicular to the fracture line, to prevent displacement of the fracture during compression.
![]() If there is good compression, the second and third screws can be in neutralization mode.
If there is good compression, the second and third screws can be in neutralization mode.
![]() If compression from the first screw was poor, additional screws can be placed in the lag mode.
If compression from the first screw was poor, additional screws can be placed in the lag mode.
![]() Consider placing one screw more perpendicular to the long axis of the phalanx to resist axial forces.
Consider placing one screw more perpendicular to the long axis of the phalanx to resist axial forces.
![]() While screws are being placed, the reduction can be held either by a reduction clamp or with a temporary K-wire. The hole made by the temporary K-wire, after removal, can be used for the last screw.
While screws are being placed, the reduction can be held either by a reduction clamp or with a temporary K-wire. The hole made by the temporary K-wire, after removal, can be used for the last screw.
DORSAL AND VOLAR CORONAL SHEAR FRACTURE WITH SCREWS OR K-WIRES
![]() A dorsal approach typically is used for dorsal fractures and a volar approach for volar fractures.
A dorsal approach typically is used for dorsal fractures and a volar approach for volar fractures.
![]() Dental picks are used for all fragment manipulation and reduction.
Dental picks are used for all fragment manipulation and reduction.
![]() Traction generally does not help reduction.
Traction generally does not help reduction.
![]() Because fragments usually are very small, fixation with 0.028-inch K-wires may involve crossing the joint surface.
Because fragments usually are very small, fixation with 0.028-inch K-wires may involve crossing the joint surface.
![]() Typically, a trade-off must be made in terms of implant position.
Typically, a trade-off must be made in terms of implant position.
![]() For example, in a dorsal shear fragment, it may be necessary for a K-wire to pass through the dorsal articular surface of the fragment into the condyle below. Try to stay as dorsal as possible to minimize impingement in extension, while still securing the fragment adequately. It is possible to bury a screw beneath the articular surface, but if it is possible to use K-wires, they are preferred for their small and temporary footprint. A dorsal shear fracture with a nonarticular component would be a better choice for screw fixation than an allarticular fragment.
For example, in a dorsal shear fragment, it may be necessary for a K-wire to pass through the dorsal articular surface of the fragment into the condyle below. Try to stay as dorsal as possible to minimize impingement in extension, while still securing the fragment adequately. It is possible to bury a screw beneath the articular surface, but if it is possible to use K-wires, they are preferred for their small and temporary footprint. A dorsal shear fracture with a nonarticular component would be a better choice for screw fixation than an allarticular fragment.
![]() We do not have experience with absorbable implants, but would be concerned about their use due to the small size of the fragments and resorption products.
We do not have experience with absorbable implants, but would be concerned about their use due to the small size of the fragments and resorption products.
BICONDYLAR FRACTURE WITH OPEN REDUCTION AND INTERNAL FIXATION
![]() Use a dental pick to align the condylar fragments and secure with a K-wire or screw.
Use a dental pick to align the condylar fragments and secure with a K-wire or screw.
![]() Similar to previous discussion, if reduction is achieved percutaneously, one or two K-wires may be used to secure the condyles to each other.
Similar to previous discussion, if reduction is achieved percutaneously, one or two K-wires may be used to secure the condyles to each other.
![]() Typically, open reduction is required, in which case screws are preferred whenever possible.
Typically, open reduction is required, in which case screws are preferred whenever possible.
![]() Occasionally, if it is difficult to the secure the two condylar fragments to each other, try reducing the largest condylar piece to the shaft and hold it with a K-wire. Then reduce the smaller condylar piece or pieces to the main construct. Once the entire reduction is achieved and held with clamps or K-wires, a screw can be placed transversely across the condyles.
Occasionally, if it is difficult to the secure the two condylar fragments to each other, try reducing the largest condylar piece to the shaft and hold it with a K-wire. Then reduce the smaller condylar piece or pieces to the main construct. Once the entire reduction is achieved and held with clamps or K-wires, a screw can be placed transversely across the condyles.
![]() If minimal metaphyseal comminution is present, the condylar fragments are secured to the shaft using K-wires (TECH FIG 5).
If minimal metaphyseal comminution is present, the condylar fragments are secured to the shaft using K-wires (TECH FIG 5).
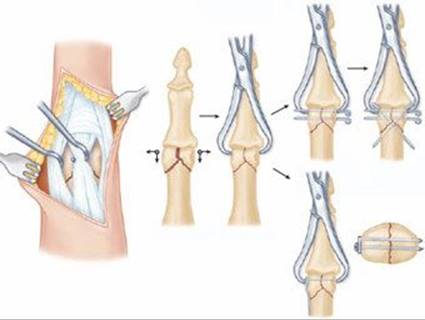
TECH FIG 5 • Reduction of bicondylar fractures begins with reduction of the condyles to each other. The condyles are then secured to the shaft.
Condylar Plate
![]() If metaphyseal comminution is present, consider a condylar plate (TECH FIG 6).
If metaphyseal comminution is present, consider a condylar plate (TECH FIG 6).
![]() The reduction starts with the condylar fragments, ignoring any proximal comminution.
The reduction starts with the condylar fragments, ignoring any proximal comminution.
![]() These fragments are held temporarily while the condylar plate is drilled and placed into just the distal fragment.
These fragments are held temporarily while the condylar plate is drilled and placed into just the distal fragment.
![]() Care must be taken to align the plate on the condyles so that the plate aligns with the shaft, once the condylar/plate construct is reduced to the shaft, bypassing the comminution.
Care must be taken to align the plate on the condyles so that the plate aligns with the shaft, once the condylar/plate construct is reduced to the shaft, bypassing the comminution.
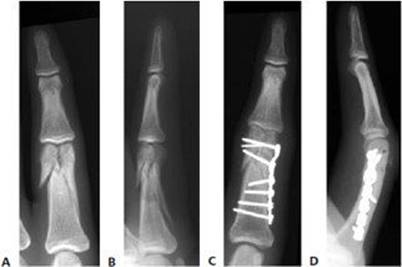
TECH FIG 6 • A,B. Radiographs of a bicondylar fracture. C,D. Postoperative radiographs after reduction and application of a condylar plate fixation. (Courtesy of Alan Freeland, MD.)
TRIPLANE FRACTURE WITH OPEN REDUCTION AND FIXATION USING LAG SCREWS AND K-WIRES
![]() An extensile dorsal approach is used.
An extensile dorsal approach is used.
![]() TECH FIG 7 shows a triplane fracture in a 42-year-old carpenter with a table saw injury, who was treated as follows:
TECH FIG 7 shows a triplane fracture in a 42-year-old carpenter with a table saw injury, who was treated as follows:
![]() The collateral ligaments were attached to the two volar condylar pieces.
The collateral ligaments were attached to the two volar condylar pieces.
![]() Lag screws were placed into each condyle from dorsal to volar.
Lag screws were placed into each condyle from dorsal to volar.
![]() A K-wire was used to secure the condyles to the shaft and keep the joint reduced.
A K-wire was used to secure the condyles to the shaft and keep the joint reduced.
![]() Metaphyseal comminution has been treated with bone grafting and, in some cases, distraction external fixation for 3 weeks, after which motion is commenced.1
Metaphyseal comminution has been treated with bone grafting and, in some cases, distraction external fixation for 3 weeks, after which motion is commenced.1
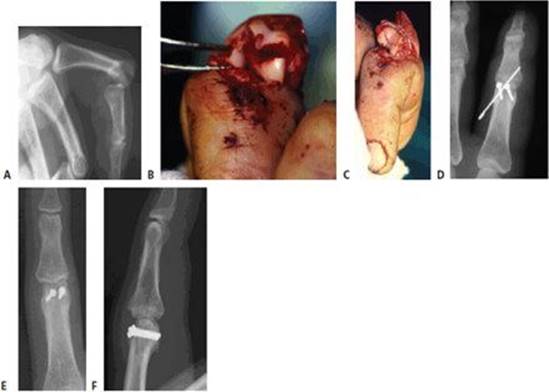
TECH FIG 7 • Triplane fracture in a 42-year-old carpenter with a table saw injury. A. Lateral radiograph shows the injury. B. Clinical photograph of the injury with the collateral ligaments attached to the two volar condylar pieces. C,D. Postreduction photograph and radiograph demonstrating lag screws placed into each condyle from dorsal to volar. A K-wire was used to secure the condyles to the shaft and keep the joint reduced. E,F. AP and lateral radiographs 1 year postoperatively. (Courtesy of Jesse Jupiter, MD)
POSTOPERATIVE CARE
![]() Fracture stability dictates the protocol, but most patients should be started on AROM within 1 week, with extension splinting of the PIP joint while at rest.
Fracture stability dictates the protocol, but most patients should be started on AROM within 1 week, with extension splinting of the PIP joint while at rest.
![]() It is important for the surgeon and therapist to communicate regarding the extent of injuries, type of fracture fixation used, and co-existing conditions, because these variables will affect the rate of healing and progression of therapy.
It is important for the surgeon and therapist to communicate regarding the extent of injuries, type of fracture fixation used, and co-existing conditions, because these variables will affect the rate of healing and progression of therapy.
![]() Exercises should be performed at least six times per day.
Exercises should be performed at least six times per day.
![]() When immobilization is involved, it is extremely important for the patient to perform AROM to all noninvolved joints to prevent secondary weakness and stiff joints in the involved extremity, as well as to aid edema control.
When immobilization is involved, it is extremely important for the patient to perform AROM to all noninvolved joints to prevent secondary weakness and stiff joints in the involved extremity, as well as to aid edema control.
![]() 1–7 days after surgery
1–7 days after surgery
![]() Control edema with Coban wraps (3M, St. Paul, MN), compressive digit sleeves, elevation and AROM, and contrast baths (if no pin or sutures are present).
Control edema with Coban wraps (3M, St. Paul, MN), compressive digit sleeves, elevation and AROM, and contrast baths (if no pin or sutures are present).
![]() A hand-based safe-position splint including the involved digit and an adjacent digit is worn between exercises and at night. Use a forearm-based splint including all digits if multiple digits are involved.
A hand-based safe-position splint including the involved digit and an adjacent digit is worn between exercises and at night. Use a forearm-based splint including all digits if multiple digits are involved.
![]() AROM exercises are used based on the stability of fracture:
AROM exercises are used based on the stability of fracture:
![]() Composite flexion and extension of the digits
Composite flexion and extension of the digits
![]() Blocking of the PIP and DIP joints to provide differential gliding of the flexor digitorum superficialis and profundus tendons (especially important following a volar exposure)
Blocking of the PIP and DIP joints to provide differential gliding of the flexor digitorum superficialis and profundus tendons (especially important following a volar exposure)
![]() Reverse blocking (metaphalangeal [MP] joints passively flexed with active interphalangeal [IP] joint extension), flexor and extensor tendon glides
Reverse blocking (metaphalangeal [MP] joints passively flexed with active interphalangeal [IP] joint extension), flexor and extensor tendon glides
![]() 7–14 days post-surgery
7–14 days post-surgery
![]() Gentle assisted AROM and passive ROM may begin as tolerated, again based on fracture stability. Passive ROM should not begin with K-wires in place.
Gentle assisted AROM and passive ROM may begin as tolerated, again based on fracture stability. Passive ROM should not begin with K-wires in place.
![]() Avoid painful ROM and monitor splints closely for excessive forces on the PIP joint. This can result in a counterproductive inflammatory and fibroblastic response.
Avoid painful ROM and monitor splints closely for excessive forces on the PIP joint. This can result in a counterproductive inflammatory and fibroblastic response.
![]() Early scar management (approximately 10–14 days)
Early scar management (approximately 10–14 days)
![]() When the incision or pin site has healed, begin scar massage with lotion.
When the incision or pin site has healed, begin scar massage with lotion.
![]() Superficial heat application applied before scar massage helps increase scar pliability.
Superficial heat application applied before scar massage helps increase scar pliability.
![]() If scar sensitivity develops, introduce scar desensitization, to include stimulation of the sensitive scar with graded textures and tactile pressure and tapping of scar, progressing as the patient develops increased tolerance to each stimulus.
If scar sensitivity develops, introduce scar desensitization, to include stimulation of the sensitive scar with graded textures and tactile pressure and tapping of scar, progressing as the patient develops increased tolerance to each stimulus.
![]() If scar adherence persists, use iontophoresis with Iodex (Baar Products, Inc., Downingtown, PA) to soften the scar.
If scar adherence persists, use iontophoresis with Iodex (Baar Products, Inc., Downingtown, PA) to soften the scar.
![]() For a raised scar, encourage scar remodeling by use of a nocturnal scar pad, such as elastomere or Otoform K (AliMed, Deham, MA).
For a raised scar, encourage scar remodeling by use of a nocturnal scar pad, such as elastomere or Otoform K (AliMed, Deham, MA).
![]() After initial fracture healing (about 4–6 weeks)
After initial fracture healing (about 4–6 weeks)
![]() Assisted and passive ROM should be started if they have not been initiated earlier.
Assisted and passive ROM should be started if they have not been initiated earlier.
![]() Continue the “safe position” splint between exercises and at night.
Continue the “safe position” splint between exercises and at night.
![]() As the patient's pain level decreases and functional use of the involved digit increases, reduce the splint to a gutter splint worn at night to prevent PIP flexion contracture.
As the patient's pain level decreases and functional use of the involved digit increases, reduce the splint to a gutter splint worn at night to prevent PIP flexion contracture.
![]() If a flexion contracture develops at the PIP joint, consider serial extension casting of the involved digit. The contracture should be no more than 45 degrees, because the patient will have difficulty donning the serial cast with any greater degree of joint contracture. Dynamic splinting or static progressive splinting by day may be used as needed.
If a flexion contracture develops at the PIP joint, consider serial extension casting of the involved digit. The contracture should be no more than 45 degrees, because the patient will have difficulty donning the serial cast with any greater degree of joint contracture. Dynamic splinting or static progressive splinting by day may be used as needed.
![]() Progressively wean splints as passive ROM improves, and encourage active ROM.
Progressively wean splints as passive ROM improves, and encourage active ROM.
![]() Strengthening (about 8 weeks)
Strengthening (about 8 weeks)
![]() Progressive strengthening can be initiated with light putty and further progressed with activities appropriate for the patient's occupation.
Progressive strengthening can be initiated with light putty and further progressed with activities appropriate for the patient's occupation.
![]() About 10 weeks
About 10 weeks
![]() Discharge all splinting.
Discharge all splinting.
![]() Encourage unrestricted use of the involved digit and hand.
Encourage unrestricted use of the involved digit and hand.
![]() In closed fractures, with a good soft tissue envelope and blood supply, K-wires should be removed at about 3 weeks to facilitate rehabilitation.
In closed fractures, with a good soft tissue envelope and blood supply, K-wires should be removed at about 3 weeks to facilitate rehabilitation.
Overcoming Issues Related to Rehabilitation
Decreased PIP Joint Flexion
![]() The reason for decreased flexion at the PIP joint must be determined. If the joint has full PIP joint flexion on passive ROM and decreased PIP joint flexion on active ROM, the problem most likely is caused by adhesions.
The reason for decreased flexion at the PIP joint must be determined. If the joint has full PIP joint flexion on passive ROM and decreased PIP joint flexion on active ROM, the problem most likely is caused by adhesions.
![]() Treatment should attempt to regain ROM through active exercise:
Treatment should attempt to regain ROM through active exercise:
![]() Before treatments, application of heat is useful to increase tissue extensibility for increased ROM gains and assist the patient with increased tolerance to exercise.
Before treatments, application of heat is useful to increase tissue extensibility for increased ROM gains and assist the patient with increased tolerance to exercise.
![]() Superficial modalities such as moist hot pack, paraffin, and fluidotherapy may be used. Benefits of fluidotherapy include the ability to actively stretch with application of heat.
Superficial modalities such as moist hot pack, paraffin, and fluidotherapy may be used. Benefits of fluidotherapy include the ability to actively stretch with application of heat.
![]() Ultrasound may be used to heat deeper tissues.
Ultrasound may be used to heat deeper tissues.
![]() Exercises
Exercises
![]() Tendon glides
Tendon glides
![]() Isolated blocking of the flexor digitorum superficialis and profundus tendons to maximize differential tendon gliding
Isolated blocking of the flexor digitorum superficialis and profundus tendons to maximize differential tendon gliding
![]() Active flexion of the digit against resistance, such as hook fist exercises performed with therapeutic putty, or raking the digits through putty
Active flexion of the digit against resistance, such as hook fist exercises performed with therapeutic putty, or raking the digits through putty
![]() Blocking splint for exercise: the MP joints are blocked in extension by a splint with the PIP joints free. The patient performs active PIP flexion and extension to increase differential glide of the tendons (FIG 5A).
Blocking splint for exercise: the MP joints are blocked in extension by a splint with the PIP joints free. The patient performs active PIP flexion and extension to increase differential glide of the tendons (FIG 5A).
![]() Neuromuscular electrostimulation of the flexor digitorum superficialis and profundus may be used to assist active ROM and tendon glide.
Neuromuscular electrostimulation of the flexor digitorum superficialis and profundus may be used to assist active ROM and tendon glide.
![]() If the fracture is healed and passive ROM of the joint is limited in flexion, passive ROM exercises and splinting alternatives will assist to progressively stretch a tight joint capsule and elongate shortened ligaments. Splinting options include:
If the fracture is healed and passive ROM of the joint is limited in flexion, passive ROM exercises and splinting alternatives will assist to progressively stretch a tight joint capsule and elongate shortened ligaments. Splinting options include:
![]() Static progressive splinting
Static progressive splinting
![]() Use of a dynamic flexion splint (FIG 5B)
Use of a dynamic flexion splint (FIG 5B)
![]() Passive ROM and joint mobilizations are appropriate if the fracture is healed.
Passive ROM and joint mobilizations are appropriate if the fracture is healed.
![]() Use of heat (as discussed earlier) to increase tissue extensibility will make the patient more comfortable and help increase ROM. To assist stretch into flexion with heat, try wrapping the digit(s) in flexion with Coban and dipping them in paraffin.
Use of heat (as discussed earlier) to increase tissue extensibility will make the patient more comfortable and help increase ROM. To assist stretch into flexion with heat, try wrapping the digit(s) in flexion with Coban and dipping them in paraffin.
Decreased PIP Joint Extension
![]() The appropriate treatment approach depends on the structures involved. If the PIP joint can be passively placed into full extension but is unable to actively extend, the extensor apparatus may be scarred down.
The appropriate treatment approach depends on the structures involved. If the PIP joint can be passively placed into full extension but is unable to actively extend, the extensor apparatus may be scarred down.
![]() The following treatments are beneficial to increase active extension of the PIP joint.
The following treatments are beneficial to increase active extension of the PIP joint.
![]() Before beginning the exercises, use of superficial heat modalities and ultrasound will assist to increase tissue extensibility, ROM gains, and the patient's tolerance to exercises.
Before beginning the exercises, use of superficial heat modalities and ultrasound will assist to increase tissue extensibility, ROM gains, and the patient's tolerance to exercises.
![]() Active exercises include:
Active exercises include:
![]() Active reverse blocking (passively flex the MP joints while actively extending the IP joints to transmit the extension force to the IP joints).
Active reverse blocking (passively flex the MP joints while actively extending the IP joints to transmit the extension force to the IP joints).
![]() A reverse blocking splint is helpful to assist the patient with reverse blocking (FIG 5C).
A reverse blocking splint is helpful to assist the patient with reverse blocking (FIG 5C).
![]() Block the MP joint in flexion while actively extending the PIP joint into extension with simultaneous neuromuscular electrostimulation of the extensor digitorum communis muscle and the intrinsic muscles.
Block the MP joint in flexion while actively extending the PIP joint into extension with simultaneous neuromuscular electrostimulation of the extensor digitorum communis muscle and the intrinsic muscles.
![]() Active extension against resistance, such as theraputty
Active extension against resistance, such as theraputty
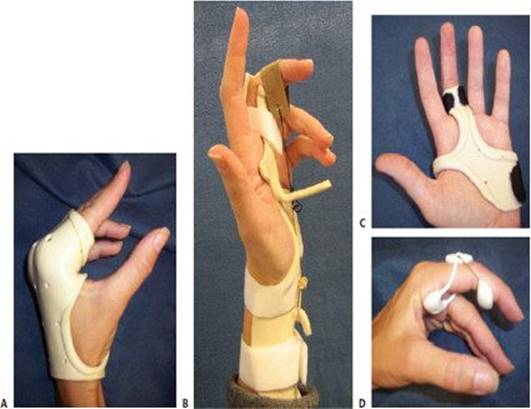
FIG 5 • A. MP blocking splint. B. Dynamic flexion splint. C. Reverse blocking splint. D. Finger-based dynamic PIP extension splint.
![]() If the fracture is healed and passive ROM of the PIP is limited with extension, exercises and splinting can assist with improving passive ROM.
If the fracture is healed and passive ROM of the PIP is limited with extension, exercises and splinting can assist with improving passive ROM.
![]() Serial casting PIP into extension
Serial casting PIP into extension
![]() Finger-based dynamic PIP extension splint (FIG 5D)
Finger-based dynamic PIP extension splint (FIG 5D)
![]() Dynamic extension splint with MP block in flexion
Dynamic extension splint with MP block in flexion
![]() Passive ROM and joint mobilizations with heat applied before these manual activities are appropriate if the fracture is healed.
Passive ROM and joint mobilizations with heat applied before these manual activities are appropriate if the fracture is healed.
Scar Adhesions Limiting Tendon Glide
![]() Active ROM, including extensor/flexor tendon glides, and scar massage and reverse scar massage (opposite the direction of the adhesion with active ROM) are key to decreasing adhesions of the tendon.
Active ROM, including extensor/flexor tendon glides, and scar massage and reverse scar massage (opposite the direction of the adhesion with active ROM) are key to decreasing adhesions of the tendon.
![]() These modalities work well in conjunction and may be used individually or in combination based on the patient's individual needs.
These modalities work well in conjunction and may be used individually or in combination based on the patient's individual needs.
![]() Superficial heat (eg, fluidotherapy, moist heat, paraffin)
Superficial heat (eg, fluidotherapy, moist heat, paraffin)
![]() Ultrasound
Ultrasound
![]() Scar pad (eg, elastomere, Otoform K)
Scar pad (eg, elastomere, Otoform K)
![]() Iontophoresis with Iodex to soften scar
Iontophoresis with Iodex to soften scar
OUTCOMES
![]() In one series of 36 patients, the arc of motion of the PIP joint averaged 72 degrees with a 13-degree extensor lag. Patients with volar coronal fractures fared worse, with an average arc of 57 degrees.5
In one series of 36 patients, the arc of motion of the PIP joint averaged 72 degrees with a 13-degree extensor lag. Patients with volar coronal fractures fared worse, with an average arc of 57 degrees.5
![]() In the McCue series of 32 patients treated with open reduction and two K-wires, flexion averaged greater than 93 degrees and extensor lag averaged less than 5 degrees.3
In the McCue series of 32 patients treated with open reduction and two K-wires, flexion averaged greater than 93 degrees and extensor lag averaged less than 5 degrees.3
COMPLICATIONS
![]() Loss of PIP joint motion is the most common complication.
Loss of PIP joint motion is the most common complication.
![]() Fixation must be secure enough to allow early motion.
Fixation must be secure enough to allow early motion.
![]() Delay of motion of the hand by more than a few weeks significantly decreases final outcome.2 Ideally, motion should be initiated in the immediate postoperative period.
Delay of motion of the hand by more than a few weeks significantly decreases final outcome.2 Ideally, motion should be initiated in the immediate postoperative period.
![]() Increases in motion may be obtained up to 1 year after the injury, although opportunity does decrease with time.2
Increases in motion may be obtained up to 1 year after the injury, although opportunity does decrease with time.2
![]() Dorsal capsulotomies and extensor tenolysis are options for patients lacking flexion.
Dorsal capsulotomies and extensor tenolysis are options for patients lacking flexion.
![]() Loss of reduction is common if fractures are not stabilized or are stabilized with only one point of fixation.5
Loss of reduction is common if fractures are not stabilized or are stabilized with only one point of fixation.5
REFERENCES
1. Chin KR, Jupiter JB. Treatment of triplane fractures of the head of the proximal phalanx. J Hand Surg Am 1999;24:1263–1268.
2. Freeland AE, Benois LA. Open reduction and internal fixation method for fractures at the proximal interphalangeal joint. Hand Clinics 1994;10:239–250.
3. McCue FC, Honner R, Johnson MC, et al. Athletic injuries of the proximal interphalangeal joint requiring surgical treatment. J Bone Joint Surg Am 1970;52A:937–956.
4. O'Rourke SK, Gaur S, Barton NJ. Long-term outcome of articular fractures of the phalanges: an eleven year follow-up. J Hand Surg Br 1989;14:183–193.
5. Weiss APC, Hastings HH. Distal unicondylar fractures of the proximal phalanx. J Hand Surg Am 1993;18:594–599.