Research has demonstrated that drawing the abdominal wall inward tends to produce activation of the transversus abdominis and internal oblique muscles. As discussed in chapter 2, these muscles have been shown to be very important for core stability and protection of the lower back. Hence, pulling in the abdominal wall, hollowing, and scooping (typically accompanying spinal flexion) are commonly used as cues in Pilates exercises to develop desired activation of these key muscles.
However, many functional movements used in everyday life do not involve or permit a scooping inward motion of the abdominal wall, yet core stability is still vital. Therefore, this chapter includes exercises that focus on keeping the pelvis and spine stable while the spine is neutral or slightly arched (spinal hyperextension) rather than scooped (spinal flexion). This demands a subtle, coordinated contraction of both the abdominals and spinal extensors, sometimes termed bracing. Some researchers hold that training to incorporate bracing is essential for protecting the spine during lifting, athletics, and other activities that involve large forces.
The exercises in this chapter also share the characteristic that the pelvis is not resting on the mat but rather is lifted off the mat so the trunk forms a bridge shape, with the limbs helping to provide support structures for this bridge. In rehabilitation, the term bridging often refers to exercises in which the hip extensors, particularly the hamstrings and gluteus maximus, are used to lift the pelvis from the mat. The hip extensors are very important for posterior stability of the pelvis, and Shoulder Bridge (page 128) and Leg Pull (page 138) fit this more traditional description of bridging. However, these two exercises differ from each other in that Leg Pull uses a neutral position of the spine and pelvis while Shoulder Bridge uses a slightly arched position of the spine. In addition, the arms are bent as they support the trunk in Shoulder Bridge. This arched position of the spine and use of arm support is shared by two other exercises, Scissors (page 131) and Bicycle (page 134). However, in Shoulder Bridge one leg also helps support, while in Scissors and Bicycle both legs are in the air, moving with a split action or cycling action. The hands provide crucial support for the pelvis throughout. All of these exercises share the key challenge of maintaining stability of the spine and pelvis, with the spine in a neutral or slightly arched position while one or both legs move through space.
The last two exercises of this chapter, Leg Pull Front (page 142) and Push-Up (page 145), share the characteristic of the pelvis being lifted off the mat, with the limbs acting as support structures. However, they differ from the earlier exercises in this chapter in that the trunk is facing down versus up. In this position, gravity tends to make the lower back arch and the hips extend. Therefore, a slightly different use of core muscles is required to keep the pelvis and spine neutral and stable as one leg lifts and lowers in Leg Pull Front or the arms bend and straighten in Push-Up.
![]()
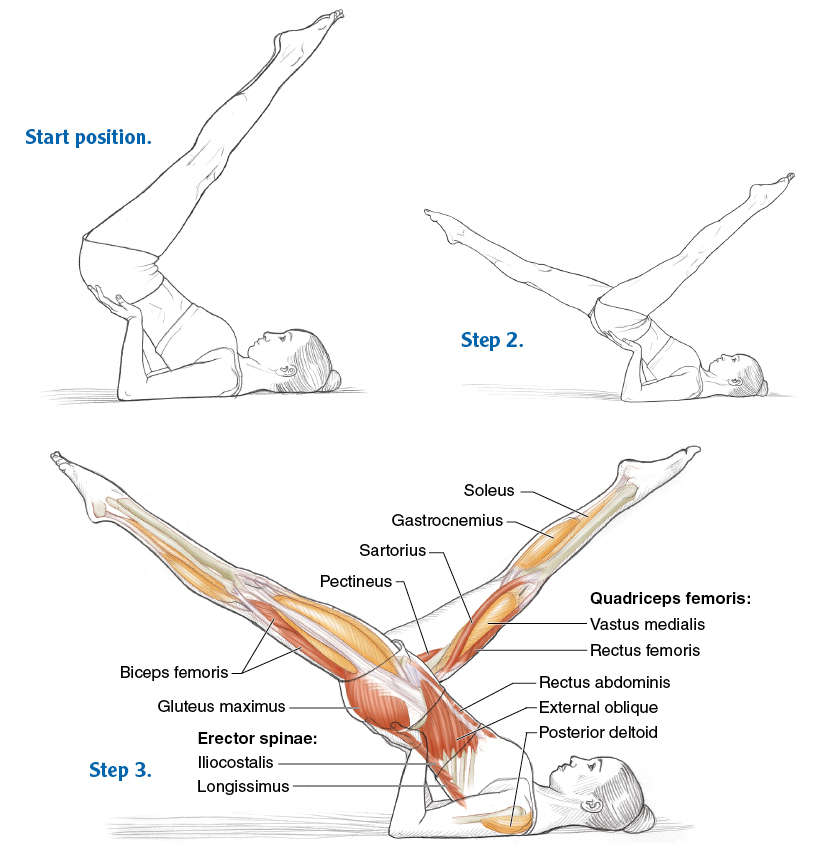
Shoulder Bridge

Execution
1. Start position. Lie supine with the knees bent and the feet flat on the mat, hip-width apart. Place the arms by the sides with the palms facing down. Curl the pelvis off the mat, and place the palm of each hand at the waist, fingers facing inward, with the hands helping to support the weight of the trunk as shown. Lift one foot off the mat, bringing the knee toward the chest, and then straighten the knee so that the leg is reaching toward the ceiling with the foot gently pointed as shown.
2. Exhale. Lower the up-stretched leg down toward the mat as shown.
3. Inhale. Lift the leg back up (as shown in the main muscle illustration), ending in a vertical position. Repeat the sequence five times. Return to the mid start position. Perform the same sequence five times on the opposite leg. Finish by rolling the pelvis down to the initial start position.
Targeted Muscles
Posterior spinal stabilizers: erector spinae (spinalis, longissimus, iliocostalis), semispinalis, deep posterior spinal group
Anterior spinal stabilizers: rectus abdominis, external oblique, internal oblique, transversus abdominis
Hip extensors: gluteus maximus, hamstrings (semimembranosus, semitendinosus, biceps femoris)
Hip flexors: iliopsoas, rectus femoris, sartorius, tensor fascia latae, pectineus
Accompanying Muscles
Knee extensors: quadriceps femoris
Ankle–foot plantar flexors: gastrocnemius, soleus
Shoulder extensors: latissimus dorsi, teres major, posterior deltoid
Scapular adductors: trapezius, rhomboids
Technique Cues
• In the start position, press the feet into the mat and think of lifting the bottom of the pelvis toward the ceiling to emphasize use of the hip extensors, especially the hamstrings, as previously discussed with Pelvic Curl (page 52). The knee extensors also help raise the thighs. Then use the hip flexors followed by the knee extensors to bring one leg to a vertical position.
• Focus on pressing the upper arms down into the mat and lifting the chest to encourage use of the shoulder extensors and spinal extensors. This will aid with arching the back and lifting the pelvis high enough to allow the hands to provide support.
• Simultaneously, focus on pulling the lower attachment of the abdominals up to prevent the pelvis from tilting forward too far and to help maintain stability of the spine and pelvis throughout the exercise.
• While core stability is maintained, think of keeping the moving leg long. Use the knee extensors to maintain a straight knee and the ankle–foot plantar flexors to keep the foot pointed. At the same time, use the hip extensors in step 2 to initiate lowering the leg, followed rapidly by using the hip flexors to control the continued lowering of the leg. The hip flexors then begin to raise the leg back up in step 3.
• Imagine. Imagine your spine is arching like a Japanese bridge over a river while one leg moves without disrupting this stable, strong arch.
Exercise Notes
This exercise offers an advanced challenge to pelvic stability since the pelvis is off the mat as one leg supports the body and the other leg moves up and down through a large range of motion. In addition, the spine is arched slightly, so extra care must be taken to keep the pelvis stationary as the leg lowers, further described in Scissors (page 131). If adequate stability is maintained, this exercise also offers dynamic flexibility benefits for the hamstring and hip flexor muscles.
Modification
If you are unable to maintain pelvic stability, try performing the exercise with the pelvis slightly tilted posteriorly as described in the variation, and move the leg through a smaller range.
Variation
You can perform this exercise with the pelvis raised off the mat with a slight posterior pelvic tilt and without hand support. The foot can be flexed as the leg rises (ankle–foot dorsiflexion) to emphasize a dynamic hamstring stretch at the top of the movement.
![]()
Scissors
Execution
1. Start position. Lie supine with the arms by the sides and the palms facing down. The legs are held straight out at an angle of about 60 degrees relative to the mat or higher if pelvic stability cannot be maintained at 60 degrees. Raise the legs and curl the pelvis off the mat until the feet are above the head. Place the heel of each hand toward the back of the waistline, with the fingers pointing down toward the coccyx. Allow the pelvis to lower slightly so the hands help support the weight of the pelvis while the lower back is slightly arched (spinal hyperextension).
2. Inhale. Lower one leg while the other leg continues to reach overhead to form a split position as shown.
3. Exhale. Switch the legs as shown in the main muscle illustration. Repeat the sequence 5 times on each leg, 10 times in total. Finish by bringing the legs together as in the start position and rolling down to the mat.
Targeted Muscles
Posterior spinal stabilizers: erector spinae (spinalis, longissimus, iliocostalis), semispinalis, deep posterior spinal group
Anterior spinal stabilizers: rectus abdominis, external oblique, internal oblique, transversus abdominis
Hip flexors: iliopsoas, rectus femoris, sartorius, tensor fasciae latae, pectineus
Hip extensors: gluteus maximus, hamstrings (semimembranosus, semitendinosus, biceps femoris)
Accompanying Muscles
Knee extensors: quadriceps femoris
Ankle–foot plantar flexors: gastrocnemius, soleus
Shoulder extensors: latissimus dorsi, teres major, posterior deltoid
Scapular adductors: trapezius, rhomboids
Technique Cues
• In step 1, think of pulling up the front and back of the pelvis simultaneously so that the posterior spinal stabilizers and abdominals cocontract appropriately to create a slight arch of the lower back. Maintain this position of the spine and a stable pelvis throughout the exercise.
• Concentrate on using the scapular adductors to pull the scapulae together slightly rather than letting the shoulders round forward. Continue pressing the arms down into the mat to encourage use of the shoulder extensors to help keep the upper trunk lifted off the mat.
• Reach your legs in opposite directions in steps 2 and 3 while maintaining a completely still trunk. Use the knee extensors to keep the knees straight and the ankle–foot plantar flexors to keep the feet pointed to help achieve the desired long leg line.
• To initiate the switch from step 2 to step 3, raise the bottom leg with the hip flexors and initiate the lowering of the top leg with the hip extensors. After the legs pass vertical, the opposite muscles then become important for controlling the legs as they work against gravity.
• At the end of the split, emphasize the opposition of using the hip flexors to reach up with the top leg while using the hip extensors to reach down with the bottom leg. This opposition can help maintain core stability while maximizing the range of the legs to achieve the desired stretch of the hamstrings of the top leg and the hip flexors of the bottom leg simultaneously.
• Imagine. As the name of the exercise suggests, the switching of the legs should have a brisk dynamic, like opening and closing scissors, with the motion isolated to the hips.
Exercise Notes
This exercise offers many similar benefits to Shoulder Bridge (page 128), with a greater challenge to pelvic stability because both legs are off the mat and moving through a large range of motion. As with Shoulder Bridge, the pelvis is held off the mat with arm support while the back is slightly arched. Therefore, skilled stabilization of the spine and pelvis is essential for protecting the lower back and reaping the potential dynamic flexibility benefits for the hamstrings and hip flexors.
Hip flexor stretch. As described in Leg Lift Supine (page 56), the hip flexors, including the strong iliopsoas, have attachments onto the front of the pelvis and the spine. When the leg lowers and the resting length of the iliopsoas is approached, the stretch applied to the muscle can easily pull the pelvis forward, while the iliopsoas remains at approximately the same length. However, if the pelvis is held stationary, further lowering of the leg will lengthen the muscle (i.e., create a dynamic stretch). Learning to stabilize the pelvis so that an effective stretch can be applied to the iliopsoas is an important skill since tight hip flexors are associated with postural problems such as an arched lower back (lumbar hyperlordosis). Furthermore, many Pilates exercises such as Hundred (page 78) and Rollover With Legs Spread (page 112) use the hip flexors to support the legs off the mat in a relatively small range of movement, potentially resulting in tightness of the hip flexors. Therefore, exercises that incorporate a dynamic stretch are valuable for helping to prevent tightness of these key postural muscles.

Modification
If you are unable to maintain pelvic stability or if you experience any back discomfort, try performing the exercise with the pelvis and lower back in a neutral position and the hands positioned above the pelvis to support the lower back.
Variation
Following Rollover With Legs Spread (page 112) in step 1, bend the knees to create a ball shape with the body. Place the hands under the pelvis for support, and then straighten the legs to a vertical position. Stretch the legs in opposite directions, performing a double pulse in the split position accompanied by an exhale, while the leg switch occurs on the inhale. This is similar to the pattern used in Single Straight-Leg Stretch (page 84). In the split position, each leg should be equidistant from the vertical line, creating an even V shape.
![]()
Bicycle

Execution
1. Start position. Start in the same position as for Scissors (page 131), with the legs in the split position as shown.
2. Inhale. Bend the bottom leg, bringing the heel toward the buttocks as shown.
3. Exhale. Raise the bottom leg toward your chest with the knee bent while the top leg lowers with the knee straight. Then straighten the top leg to create the split position.
4. Inhale. Bend the bottom leg, bringing the heel toward the buttocks while the top leg reaches overhead.
5. Exhale. Raise the bottom leg toward your chest with the knee bent while lowering the top leg with the knee straight. See the main muscle illustration. Then straighten the top leg to create the split position. Repeat the sequence 5 times on each leg, 10 times in total.
Targeted Muscles
Posterior spinal stabilizers: erector spinae (spinalis, longissimus, iliocostalis), semispinalis, deep posterior spinal group
Anterior spinal stabilizers: rectus abdominis, external oblique, internal oblique, transversus abdominis
Hip flexors: iliopsoas, rectus femoris, sartorius, tensor fasciae latae, pectineus
Hip extensors: gluteus maximus, hamstrings (semimembranosus, semitendinosus, biceps femoris)
Accompanying Muscles
Knee flexors: hamstrings
Knee extensors: quadriceps femoris
Ankle–foot plantar flexors: gastrocnemius, soleus
Shoulder extensors: latissimus dorsi, teres major, posterior deltoid
Scapular adductors: trapezius, rhomboids
Technique Cues
• As with Scissors (page 131), in step 1 think of pulling up the front and back of the pelvis simultaneously so that the abdominals and posterior spinal stabilizers work together to create a slight arch of the lower back. Maintain this position of the spine and a stable pelvis throughout the exercise.
• Concentrate on using the scapular adductors to pull the scapulae slightly together rather than letting the shoulders round forward. Also focus on pressing the elbows down into the mat to encourage use of the shoulder extensors to keep the upper trunk lifted off the mat.
• While maintaining a stable trunk, reach both legs out in opposite directions in the split position. Use the knee extensors to straighten the knees and the ankle–foot plantar flexors to point the feet to help achieve the desired long leg line.
• In steps 2 and 4, the hip extensors keep the bottom leg close to the mat while the hamstrings also function as knee flexors to bend the knee. Simultaneously, think of continuing to reach the top leg above the head to encourage adequate use of the hip flexors, similar to Scissors (page 131). This also will help prevent the movements of the bottom leg from pulling down the top leg.
• In steps 3 and 5, think of drawing the bottom knee up toward your chest, initially using the hip flexors. At the same time, reach the top leg over and down, initially using the hip extensors. As the legs cross vertical, the opposite muscles will be used to control the legs as they work against gravity. Use the knee extensors to straighten the top leg. At the end of this phase, the muscles that initiated the movement will be used again to achieve a maximum split position and apply the desired stretch to the hamstrings of the top leg and hip flexors of the bottom leg.
• Imagine. As the name of the exercise suggests, the movement of the legs should be smooth, rhythmic, and coordinated, like cycling on a bicycle with very large pedals and wheels.
Exercise Notes
This exercise builds on the challenge of Scissors (page 131) by adding complexity to the leg movement. This makes it more difficult to maintain stability of the pelvis and lower back in the arched position. Similar to Scissors, when properly performed, Bicycle also offers dynamic flexibility benefits for the hip flexors and hamstrings.
Modification
If you are unable to maintain pelvic stability or if you experience any back discomfort, try performing the exercise with the pelvis and lower back in a neutral position and the hands positioned above the pelvis to support the lower back.
Variation
This exercise can also be performed with greater lumbar hyperextension as shown. In this variation, the goal is to touch the mat with the toes of the bottom leg as the knee bends while maintaining core stability. This variation is good preparation for many more advanced Pilates exercises that focus on using the spinal extensors with cocontraction of the abdominals, such as Rocking (page 187) and Swan Dive (page 190). However, this variation should not be performed if you experience back discomfort or if you have a back condition and have been told by your physician to avoid spinal hyperextension.

![]()
Leg Pull

Execution
1. Start position. Sit with the legs together and outstretched to the front, with the feet pointed as shown. The arms are straight and behind the trunk, fingers pointing sideways. Lift the pelvis off the mat to form a straight line from the sides of the ankles through the knees, hips, and shoulders as shown. This position is sometimes called Back Support.
2. Inhale. Raise one leg toward the ceiling.
3. Exhale. Lower that leg back to the mat.
4. Inhale. Raise the other leg toward the ceiling.
5. Exhale. Lower that leg back to the mat. Repeat the sequence 5 times on each leg, 10 times in total.
Targeted Muscles
Posterior spinal stabilizers: erector spinae (spinalis, longissimus, iliocostalis), semispinalis, deep posterior spinal group
Anterior spinal stabilizers: rectus abdominis, external oblique, internal oblique, transversus abdominis
Hip extensors: gluteus maximus, hamstrings (semimembranosus, semitendinosus, biceps femoris)
Hip flexors: iliopsoas, rectus femoris, sartorius, tensor fasciae latae, pectineus
Shoulder extensors: latissimus dorsi, teres major, posterior deltoid
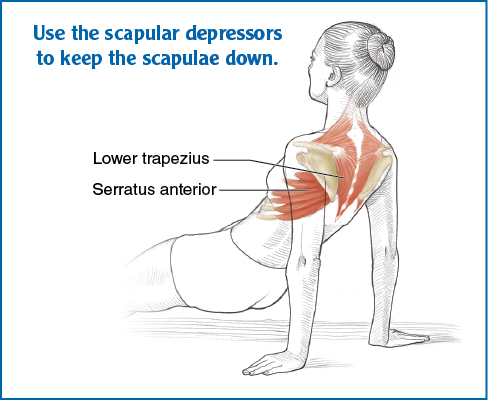
Scapular depressors: lower trapezius, serratus anterior
Scapular adductors: trapezius, rhomboids, levator scapulae
Accompanying Muscles
Knee extensors: quadriceps femoris
Ankle–foot plantar flexors: gastrocnemius, soleus
Elbow extensors: triceps brachii
Technique Cues
• In step 1, focus on pressing the feet into the mat and lifting the bottom of the pelvis toward the ceiling to emphasize use of the hip extensors, particularly the hamstrings. This will help achieve the desired straight-line position. Simultaneously, press the hands down into the mat to encourage use of the shoulder extensors to aid in lifting the upper trunk. The anterior and posterior spinal stabilizers should maintain a neutral pelvis and spine.
• As one leg is raised in steps 2 and 4 and lowered in steps 3 and 5, primarily through concentric and then eccentric action of the hip flexors, emphasize keeping the opposite side of the pelvis lifted, stationary, and neutral.
• Throughout the exercise, maintain a long line with both legs, using the knee extensors to keep the knees straight and the ankle–foot plantar flexors to keep the feet pointed. Be careful to avoid hyperextending the knee of the support leg.
• While the arms press down to emphasize continuous use of the shoulder extensors, also focus on keeping the elbows straight through use of the elbow extensors. However, avoid hyperextending the elbows. Simultaneously, emphasize keeping the scapulae down through use of the scapular depressors, and the shoulder blades back through use of the scapular adductors.
• Imagine. To help achieve the desired stability, imagine that your trunk, arms, and support leg form a bridge, and guy wires of the bridge pull the bottom of the pelvis upward so that a solid form is maintained as the moving leg swings freely up and down.
Exercise Notes
Leg Pull shares many of the benefits of Shoulder Bridge (page 128), including a dynamic hamstring stretch, but it uses a neutral position of the pelvis and spine rather than a slightly arched position. Leg Pull also requires that the pelvis remain lifted off the mat without support from the hands and that the body be supported with the arms and legs straight. This is more challenging for trunk stabilization. The longer lever created by the support leg requires that the hip extensors work harder to keep the pelvis lifted, and it offers valuable additional potential strength and endurance benefits for the hip extensors. The straight position of the arms also requires greater shoulder range of motion, providing a valuable stretch for the shoulder flexors for many people. However, supporting the body with straight limbs requires that you pay more attention to good form. Avoid knee or elbow hyperextension and excessive elevation of the scapulae or rounding forward of the shoulders. It may be helpful to use the preparatory exercise described in the modification section.
Scapular depression. As the trunk is lifted to the straight-line position, the shoulders move into extreme extension. Shoulder extension is linked naturally with elevation of the scapulae, so it is easy to allow the shoulders to lift toward the ears. Use the scapular depressors, particularly the lower trapezius and lower fibers of the serratus anterior (see the illustration), to minimize this elevation. The trapezius is on the back of the body, and its contraction alone tends to pinch the scapulae together (scapular adduction, or retraction). The serratus anterior’s forward attachments are on the sides of the rib cage, and its contraction alone tends to pull the scapulae toward the sides and front of the body (scapular abduction, or protraction). But coordinated contraction of these muscles will allow the desired scapular depression, with the scapulae also remaining the appropriate neutral distance from the spine rather than separating with the shoulders rolling forward. In step 1, focus on pulling the scapulae down slightly before lifting the trunk to help activate these muscles. Coordinated use of the trapezius and serratus anterior plays a key role in optimal use of the arms in many Pilates exercises.
Modification
Perform only step 1 (Back Support), repeatedly lifting the body from sitting to the straight-line position and lowering the pelvis back to the mat with good control and form. After developing proficiency, add raising and lowering one leg, which is Leg Pull. Back Support can be used as a warm-up before execution of Leg Pull or as an exercise in itself.
Variations
This exercise can also be performed with the arms rotated inward so that the fingers point toward the pelvis. This position can be useful to prepare for more advanced exercises done on the Pilates apparatus. In addition, you can perform consecutive repetitions of raising and lowering the leg on the same side before switching sides. Consecutive repetitions can provide greater muscular strength and endurance benefits for the hip extensors.
![]()
Leg Pull Front

Execution
1. Start position. Start with the body weight supported on the hands and toes, knees and elbows straight. The hands are directly under the shoulders, with the fingers pointing forward. The body is in plank position so the sides of the ankles, knees, pelvis, shoulders, and ears are approximately in a straight line. (This is commonly called Front Support.)
2. Inhale. Raise one leg toward the ceiling. See the main muscle illustration.
3. Exhale. Lower that leg back to the mat.
4. Inhale. Raise the opposite leg toward the ceiling.
5. Exhale. Lower that leg back to the mat. Repeat the sequence 5 times on each leg, 10 times in total.
Targeted Muscles
Anterior spinal stabilizers: rectus abdominis, external oblique, internal oblique, transversus abdominis
Hip extensors: gluteus maximus, hamstrings (semimembranosus, semitendinosus, biceps femoris)
Scapular abductors: serratus anterior, pectoralis minor
Accompanying Muscles
Posterior spinal stabilizers: erector spinae
Knee extensors: quadriceps femoris
Ankle–foot plantar flexors: gastrocnemius, soleus
Ankle–foot dorsiflexors: tibialis anterior, extensor digitorum longus
Shoulder flexors: anterior deltoid, pectoralis major (clavicular)
Elbow extensors: triceps brachii
Technique Cues
• Throughout the exercise, focus on pressing into the mat with the arms while the elbow extensors keep the elbows straight. This focus encourages use of the scapular abductors to keep the scapulae wide and the shoulder flexors to keep the chest lifted above the arms. Concentrate on using the abdominals to stabilize the lower back and pelvis.
• In steps 2 and 4, reach the leg out while using the hip extensors to lift the leg, the knee extensors to keep the knee straight, and the ankle–foot plantar flexors to point the foot. Focus on keeping the pelvis facing the mat through use of the obliques so that the lift of the leg does not rotate the pelvis. Also, use the abdominals to allow only a slight anterior tilt of the pelvis as the leg reaches its high point to the back.
• In steps 3 and 5, return the pelvis to a neutral position as primarily the hip extensors act eccentrically to control lowering the leg and the ankle–foot dorsiflexors flex the foot as it returns to the mat.
• Imagine. Imagine that the arms, trunk, and support leg form a sturdy bridge that remains solid as the other leg lifts and lowers.
Exercise Notes
This exercise offers a different challenge to pelvic stability than do prior exercises in this chapter in that the trunk is turned toward the mat rather than toward the ceiling. The desired neutral starting position requires skilled activation of the abdominals to counter the tendency of gravity to make the lower back arch and the pelvis anteriorly tilt; excessive activation of the abdominals would produce undesired rounding (flexion) of the spine. Lifting one leg can provide some toning benefits for the hip extensors as well as produce a greater stability challenge. If adequate pelvic stability is maintained, this exercise offers dynamic flexibility benefits for the hip flexors as described in Scissors (page 131). Furthermore, Leg Pull Front offers a valuable opportunity to develop vital scapular stabilization needed for any positions involving front support or pushing-type movements as well as for prevention of the postural condition termed winged scapulae.
Stabilization with the scapular abductors. In Front Support described in step 1, gravity tends to make the scapulae pinch close together toward the spine (scapular adduction, or retraction). The scapular abductors, particularly the serratus anterior, must counter this effect and maintain the desired wide, neutral position of the scapulae. Failure to stabilize the scapulae will markedly diminish the potential value of this exercise.

![]()
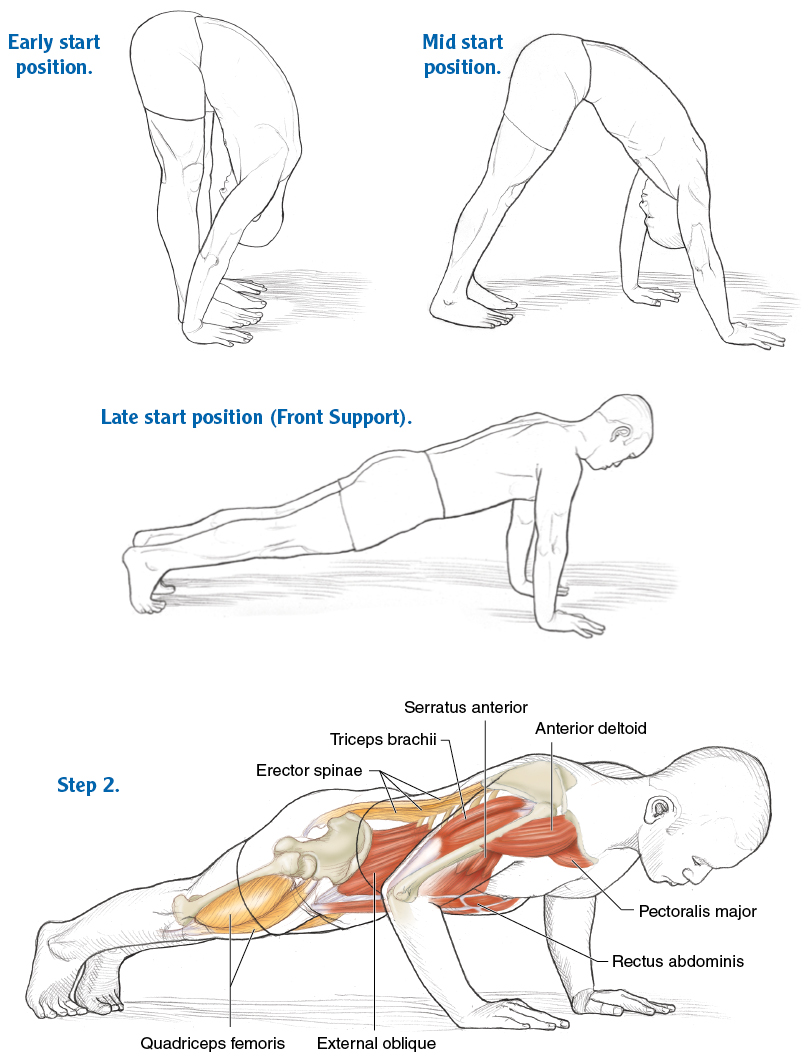
Push-Up
Execution
1. Start position. Stand with the spine bent forward and the palms on the mat or as close to the mat as your flexibility allows, as shown. Walk the palms forward to Front Support as shown.
2. Inhale. Bend the elbows and lower the chest toward the mat. See the main muscle illustration.
3. Exhale. Straighten the elbows and raise the trunk to Front Support. Do two more push-ups (steps 2 and 3), and then walk the palms back as the hips flex to return to the start position. Repeat the entire sequence five times.
Targeted Muscles
Anterior spinal stabilizers: rectus abdominis, external oblique, internal oblique, transversus abdominis
Shoulder flexors: anterior deltoid, pectoralis major (clavicular), coracobrachialis, biceps brachii (long head)
Scapular abductors: serratus anterior, pectoralis minor
Elbow extensors: triceps brachii, anconeus
Accompanying Muscles
Spinal extensors and posterior spinal stabilizers: erector spinae
Hip extensors: gluteus maximus, hamstrings
Hip flexors: iliopsoas, rectus femoris
Knee extensors: quadriceps femoris
Shoulder extensors: latissimus dorsi, teres major, pectoralis major (sternal)
Technique Cues
• When walking out to Front Support in mid start position, swing one arm forward using the shoulder flexors, place it on the mat, and then shift the torso forward over the arm through use of the shoulder extensors. As the body weight shifts in front of this support hand, after the other arm swings forward, the shoulder flexors act to keep the chest lifted and the upper torso from lowering toward the mat.
• Keep the pelvis lifted to encourage use of the abdominals to prevent the lower back from arching, and use the hip flexors to prevent hip hyperextension due to gravity as the arms walk forward and the pelvis lowers.
• When you reach Front Support in the late start position, avoid the common error of leaving the buttocks lifted in the air. Use the hip extensors to bring the bottom of the pelvis down toward the mat as the abdominals lift (abdominal–hamstring force couple) so that the pelvis comes in line with the ankles and shoulders.
• As with Leg Pull Front (page 142), in Front Support focus on using the scapular abductors to keep the scapulae wide and the knee extensors to keep the knees straight to form a long line from the heels to the head.
• In step 2, keep the elbows close by the sides as eccentric contraction of the elbow extensors controls the bending of the elbows and eccentric contraction of the shoulder flexors controls the backward movement of the upper arms, resulting in the lowering of the chest toward the mat.
• In step 3, the elbow extensors straighten the elbows, and the shoulder flexors bring the upper arms forward to raise the chest back to Front Support.
• Imagine. Imagine that the legs, trunk, and head form a drawbridge that is lowered and raised with the arms, pivoting on the toes without altering the structural integrity of the strong bridge during steps 2 and 3.
• Imagine. When walking backward in step 3, think of lifting the pelvis up toward the ceiling like a drawbridge, keeping your abdominals scooped in throughout the movement. Then focus on using the hip extensors to pull down the sit bones to help bring the pelvis into place and stabilize it.
Exercise Notes
Push-Up shares some of the benefits of Leg Pull Front, including learning to maintain a neutral Front Support with skilled use of the abdominals and scapular abductors. However, Push-Up involves movement of the arms rather than the legs in Front Support. For many people, the weight of the body is sufficient to provide important strength benefits for the shoulder flexors and elbow extensors. The shoulder flexors are used to raise the arms to the front in everyday or sporting activities, while the elbow extensors are used in pushing and overhead lifting motions. Furthermore, the dynamic movement in and out of Front Support provides additional core challenges to achieve a coordinated transition from spinal flexion to extension and back to flexion. The initial position offers potential dynamic flexibility benefits for the hamstring muscles.
Modifications
If hamstring tightness prohibits placing the palms on the mat at the beginning of the exercise, bend the knees sufficiently to allow the body weight to be supported on the palms. As Front Support is approached, smoothly straighten the knees. Perform push-ups in this position before returning to the start position, again using bent knees when transitioning to standing.
If you are having difficulty achieving the desired positioning, just practice walking out to Front Support without adding the push-up and then back again.